Make Your Own Photo Slideshow Screensaver

This tutorial shows you how to create a complete photo slideshow screensaver in Axialis Screensaver Producer — from starting a new project and adding slides, to setting transitions, durations, watermarks, audio, and finally compiling and packaging it for distribution.
In this page:
What is a Photo Slideshow Screensaver?
A slideshow screensaver displays a sequence of images with transition effects and timing you control. You can add per‑slide sounds or narration, overlay a watermark for branding, and choose whether each picture fills the screen or fits without cropping.
Why Make a Slideshow Screensaver?
- Showcase portfolios, event photos, ads, or product shots on idle screens.
- Atmosphere with smooth fades and subtle music or voice‑over per slide.
- Branding via on‑screen watermark (text or logo) and professional installation packages.
Start a New Slideshow Project
- Go to File → New Screensaver Project.
- Select Slideshow‑based Screensaver, then click Next.
- Either add photos as slides in the dialog box or click Next directly.
- Enter Title, Description, and Author, then click Finish to create the project.
Add Pictures as Slides
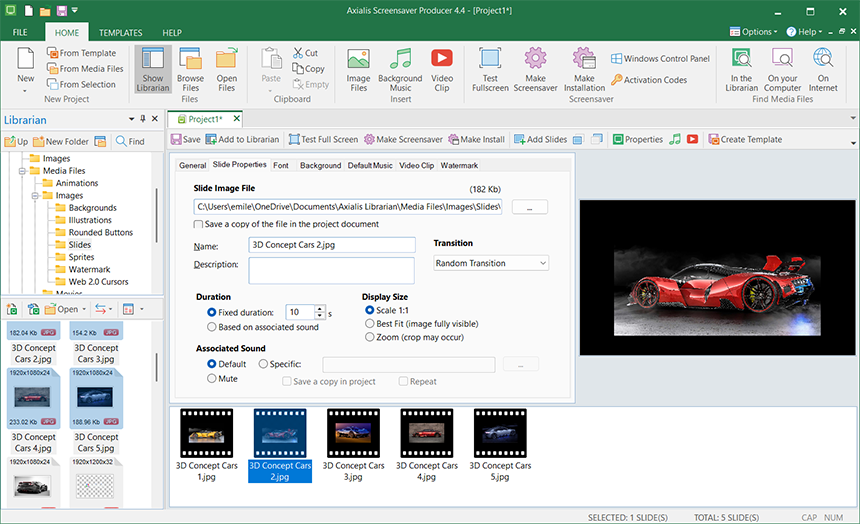
- Click Add Slides in the local toolbar, or open Slide Properties and click Add Slides.
- Select one or several image files to import (you can add more later).

Reorder Slides
In the slide list, drag & drop to reorder, or select a slide and use Move Up/Down buttons.
Choose a Transition Effect
- Open Slide Properties for the selected picture.
- In the Transition tab, select an effect or choose Random unchanged to keep a previous choice across slides.
- Set a transition length (seconds).
Set Display Duration
Still on Slide Properties, set the display time for the slide (in seconds). You can give each slide a different duration to control the rhythm of your presentation.
Full‑Screen or Fit
Decide how your photo should appear: enable Full screen to fill the entire display, or keep aspect ratio and fit without cropping depending on your preference.
Add Per‑Slide Audio (Optional)
In Slide Properties, attach an audio file (e.g., WAV/MP3/MID) to play while the slide is visible. Use this for short narrations, effects, or cues that match specific images.
Add a Watermark (Text or Logo)
For branding or copyright, use watermark options (text or picture) in slide settings to overlay your name, URL or logo. Adjust position, transparency and size for a subtle, professional result.
Save & test
- Save your project (Ctrl+S) as an .SSP file.
- Test fullscreen with F11 to check video framing and music levels before building.
Compile the screensaver (SCR)
- Click Compile (or press F4).
- Choose the output location. The builder creates a standalone .SCR file you can run or copy.
After compiling, use the built‑in preview or run the SCR to validate playback on different resolutions.
Create an install package (EXE)
- Choose Make Installation (or press Shift+F4).
- Customize the wizard (logo, icon, license agreement, options) and build the EXE installer.
- Optionally code‑sign the EXE with your certificate for a smoother end‑user experience.
Installers are compatible with modern Windows versions (32/64‑bit) and present a professional, user‑friendly setup flow.
- Use high‑resolution images; the app will scale for any screen size.
- Keep transitions and durations consistent for a calm, elegant feel; vary them for dynamic shows.
- Consider a subtle logo watermark so your brand is visible on all displays.
FAQ
Which image formats can I use?
Common formats like BMP, JPEG, PNG (with alpha), TIFF, PSD, and GIF are supported, among others.
How do I randomize slide order?
Create a varied flow by shuffling pictures before import or periodically reordering the slide list with drag & drop.
Can I combine audio with transitions?
Yes—attach audio to specific slides for narrations or effects. Keep clips short and balanced in volume to avoid abrupt changes between slides.

